搭了个本地 DNS 服务

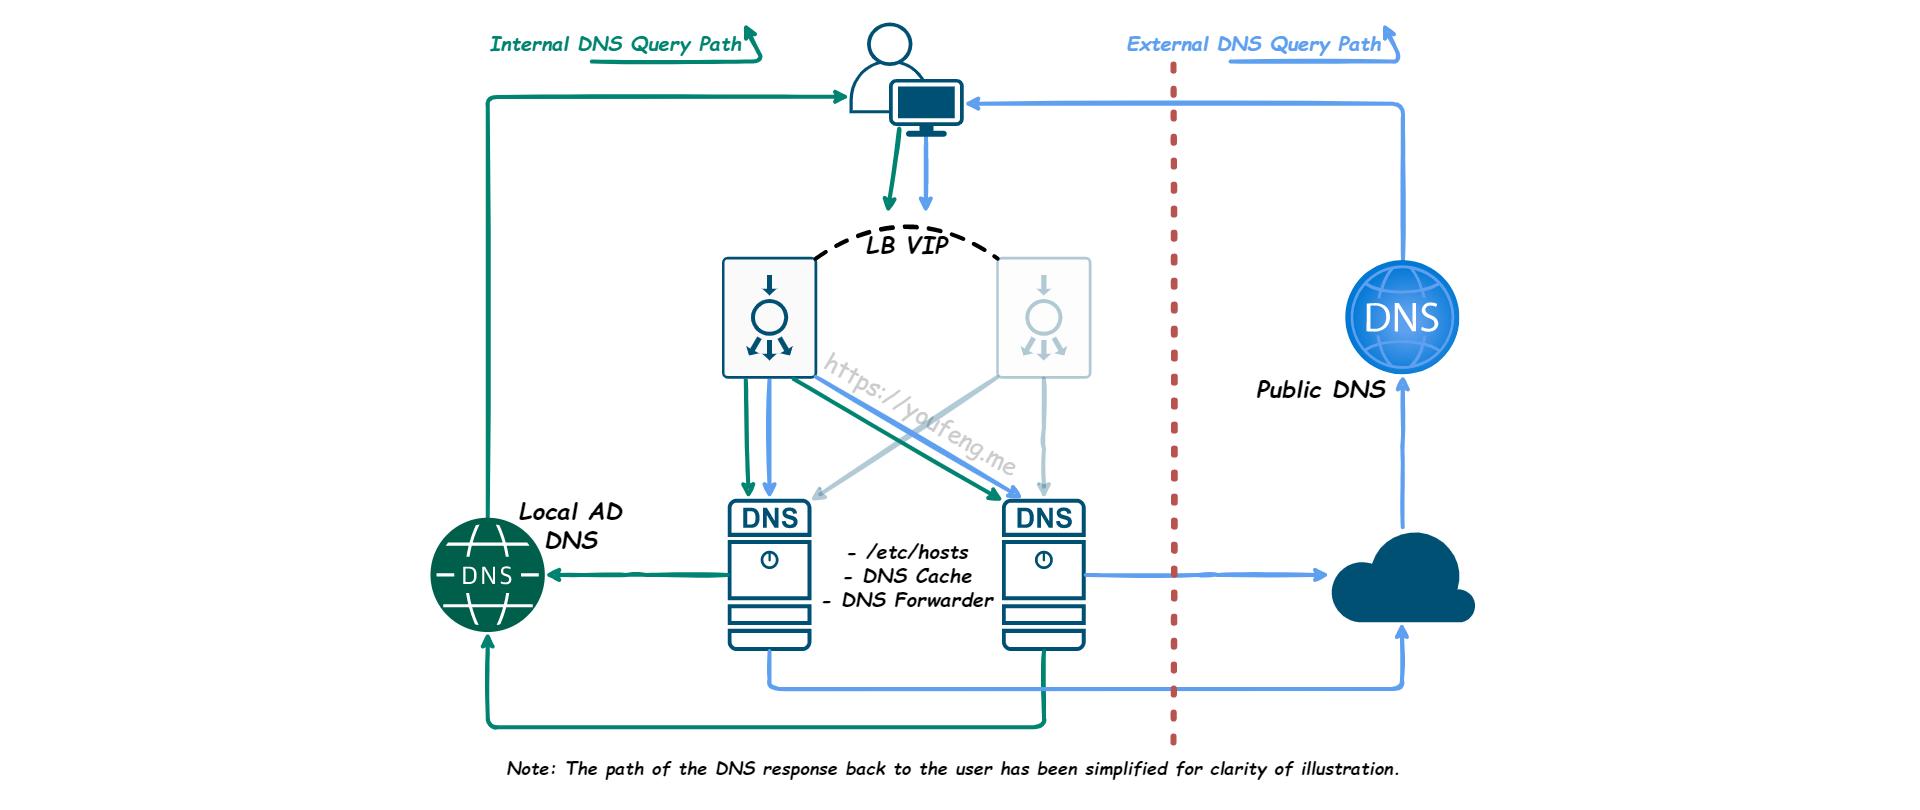
搭了个简单但相对高可用的本地 DNS 服务(如头图),严谨点儿说应该叫 DNS 递归解析器,也就是本地客户端进行 DNS 查询的第一站。
其实公司的域控上有 DNS 服务,但近期对某些外部域名的解析貌似有问题,而域控又掌握在集团手中,所以干脆自己搭一个。
目录
服务器环境准备
- 4 台虚拟机,配置需求很低
- 全新安装 Debian 11.5.0
- 基本信息规划如下
| 服务器 | 主机名 | 虚拟 IP | IP 地址 |
|---|---|---|---|
| 负载均衡(主) | debian-lb01 | 10.0.0.11 | 10.0.0.12 |
| 负载均衡(备) | debian-lb02 | 10.0.0.11 | 10.0.0.13 |
| DNS (1) | debian-dns01 | n/a | 10.0.0.14 |
| DNS (2) | debian-dns02 | n/a | 10.0.0.15 |
基础配置
设置主机名
$ hostname debian-lb01
$ hostname debian-lb02
$ hostname debian-dns01
$ hostname debian-dns02
# or
# hostnamectl set-hostname xxxx
配置网络接口地址
$ vi /etc/network/interfaces
=== debian-lb01 ===
# The loopback network interface
auto lo
iface lo inet loopback

# The primary network interface
auto ens192
allow-hotplug ens192
iface ens192 inet static
address 10.0.0.12/25
gateway 10.0.0.1
=== debian-lb02 ===
# The loopback network interface
auto lo
iface lo inet loopback

# The primary network interface
auto ens192
allow-hotplug ens192
iface ens192 inet static
address 10.0.0.13/25
gateway 10.0.0.1
=== debian-dns01 ===
# The loopback network interface
auto lo
iface lo inet loopback

iface lo inet static
address 10.0.0.11/32
scope host
description FOR LVS->DNS

# The primary network interface
auto ens192
allow-hotplug ens192
iface ens192 inet static
address 10.0.0.14/25
gateway 10.0.0.1
=== debian-dns02 ===
# The loopback network interface
auto lo
iface lo inet loopback

iface lo inet static
address 10.0.0.11/32
scope host
description FOR LVS->DNS

# The primary network interface
auto ens192
allow-hotplug ens192
iface ens192 inet static
address 10.0.0.15/25
gateway 10.0.0.1
重启网络服务使配置生效
$ systemctl restart networking
修改时区
$ timedatectl list-timezones | grep -i shanghai
$ timedatectl set-timezone Asia/Shanghai
# or
# ln -sf /usr/share/zoneinfo/Asia/Shanghai /etc/localtime
# ls -l /etc/localtime
# cat /etc/timezone
设置日期时间
$ date MMDDhhmmYYYY
# or
# date -s 2020-01-23
# date -s 12:34:56
# or
# timedatectl set-time "2020-01-23 12:34:56"
# timedatectl set-local-rtc 0
时间同步
=== debian-dns01 ===
$ apt install ntp -y
$ cp /etc/ntp.conf /etc/ntp.conf.bak

$ echo "driftfile /var/lib/ntp/ntp.drift
logfile /var/log/ntp.log
statsdir /var/log/ntpstats/
statistics loopstats peerstats clockstats
filegen loopstats file loopstats type day enable
filegen peerstats file peerstats type day enable
filegen clockstats file clockstats type day enable
server 10.0.0.24 iburst
server 10.0.0.25 iburst
server ntp.aliyun.com iburst
server ntp.tencent.com iburst
tos orphan 15
peer 10.0.0.15
restrict -4 default kod notrap nomodify nopeer noquery limited
restrict -6 default kod notrap nomodify nopeer noquery limited
restrict 127.0.0.1
restrict ::1" > /etc/ntp.conf

$ systemctl restart ntp
$ systemctl status ntp
$ ntpq -np
=== debian-dns02 ===
$ apt install ntp -y
$ cp /etc/ntp.conf /etc/ntp.conf.bak

$ echo "driftfile /var/lib/ntp/ntp.drift
logfile /var/log/ntp.log
statsdir /var/log/ntpstats/
statistics loopstats peerstats clockstats
filegen loopstats file loopstats type day enable
filegen peerstats file peerstats type day enable
filegen clockstats file clockstats type day enable
server 10.0.0.24 iburst
server 10.0.0.25 iburst
server ntp.aliyun.com iburst
server ntp.tencent.com iburst
tos orphan 15
peer 10.0.0.14
restrict -4 default kod notrap nomodify nopeer noquery limited
restrict -6 default kod notrap nomodify nopeer noquery limited
restrict 127.0.0.1
restrict ::1" > /etc/ntp.conf

$ systemctl restart ntp
$ systemctl status ntp
$ ntpq -np
=== debian-lb01 ===
$ echo NTP=10.0.0.14 >> /etc/systemd/timesyncd.conf
# or
# vi /etc/systemd/timesyncd.conf
$ timedatectl set-ntp true
$ systemctl restart systemd-timesyncd
=== debian-lb02 ===
$ echo NTP=10.0.0.15 >> /etc/systemd/timesyncd.conf
$ timedatectl set-ntp true
$ systemctl restart systemd-timesyncd
验证时间是否同步
$ systemctl status systemd-timesyncd
$ timedatectl
$ timedatectl show
$ timedatectl timesync-status
$ timedatectl show-timesync
配置 dnsmasq
=== debian-dns01 ===
$ apt install dnsmasq -y

# /etc/resolv.conf
$ echo "nameserver 127.0.0.1" > /etc/resolv.conf

# /etc/dnsmasq.conf
$ cp /etc/dnsmasq.conf /etc/dnsmasq.conf.bak
$ echo "domain-needed
bogus-priv
strict-order
server=/mycompany.net/10.0.0.25
server=/mycompany.net/10.0.0.24
server=223.5.5.5
server=119.29.29.29
local=/dl/
interface=ens192
expand-hosts
domain=dl
cache-size=1500
log-queries
log-facility=/var/log/dnsmasq.log" > /etc/dnsmasq.conf

# /etc/hosts
$ vi /etc/hosts
# 根据需要添加本地主机地址对应条目

$ systemctl restart dnsmasq.service
$ systemctl status dnsmasq.service
$ tail -n 20 /var/log/dnsmasq.log
=== debian-dns02 ===
$ apt install dnsmasq -y

$ scp root@dns01.dl:/etc/hosts /etc/hosts
# 注意修改 hosts 中的 127.0.0.1 对应的 dns01 -> dns02
$ scp root@dns01.dl:/etc/resolv.conf /etc/resolv.conf
$ cp /etc/dnsmasq.conf /etc/dnsmasq.conf.bak
$ scp root@dns01.dl:/etc/dnsmasq.conf /etc/dnsmasq.conf
$ systemctl restart dnsmasq.service
$ systemctl status dnsmasq.service
$ tail -n 20 /var/log/dnsmasq.log
=== debian-lb01 & debian-lb02 ===
$ echo "nameserver 10.0.0.14
nameserver 10.0.0.15" > /etc/resolv.conf
# 配置两台 LB 的 nameserver 为 DNS01 和 DNS02
配置 ipvsadm (direct routing)
=== debian-lb01 & debian-lb02 ===
$ echo "net.ipv4.ip_forward = 1" >> /etc/sysctl.conf
# or
# vi /etc/sysctl.conf
$ sysctl -p /etc/sysctl.conf
$ sysctl -a | grep ip_forward

$ apt install ipvsadm -y
$ ipvsadm -A -u 10.0.0.11:53 -s rr
$ ipvsadm -a -u 10.0.0.11:53 -r 10.0.0.14 -g
$ ipvsadm -a -u 10.0.0.11:53 -r 10.0.0.15 -g
$ ipvsadm -Sn > /etc/ipvsadm.rules
$ systemctl restart ipvsadm.service
$ systemctl status ipvsadm.service

$ ipvsadm -l
$ ipvsadm -ln
$ ipvsadm -lnc
=== debian-dns01 & debian-dns02 ===
$ echo "net.ipv4.conf.all.arp_ignore = 1" >> /etc/sysctl.conf
# or
# vi /etc/sysctl.conf
$ sysctl -p /etc/sysctl.conf
$ sysctl -a | grep arp_ignore

# 如果通过以下方式配置 sysctl,重启后会失效
# sysctl net.ipv4.conf.all.arp_ignore=1
# or
# echo 1 > /proc/sys/net/ipv4/conf/all/arp_ignore
# cat /proc/sys/net/ipv4/conf/all/arp_ignore
配置 keepalived
=== debian-lb01 ===
$ apt install keepalived -y

$ echo "vrrp_instance VI_1 {
    state MASTER
    interface ens192
    virtual_router_id 51
    priority 255
    advert_int 1
    authentication {
        auth_type PASS
        auth_pass &U*I9o0p
    }
    virtual_ipaddress {
        10.0.0.11/25
    }
}" > /etc/keepalived/keepalived.conf

$ systemctl restart keepalived.service
$ systemctl status keepalived.service
=== debian-lb02 ===
$ apt install keepalived -y

$ echo "vrrp_instance VI_1 {
    state BACKUP
    interface ens192
    virtual_router_id 51
    priority 254
    advert_int 1
    authentication {
        auth_type PASS
        auth_pass &U*I9o0p
    }
    virtual_ipaddress {
        10.0.0.11/25
    }
}" > /etc/keepalived/keepalived.conf

$ systemctl restart keepalived.service
$ systemctl status keepalived.service
完活儿~
其他可能用到的命令
$ cat /etc/nsswitch.conf
$ ls /sys/class/net
$ ifdown ens192
$ ifup ens192
$ nc -uvz 10.0.0.14 123
$ nc -uvz 10.0.0.15 123
$ nc -uvz 10.0.0.14 53
$ nc -uvz 10.0.0.15 53
看看别滴


